- Free Delivery*
- Superior quality
- 100% Satisfaction
- Free Swatches

Proud partner of the AIR MILES® Reward Program
Signup for rewards & exclusive savings
Choose the type of installation
Chantale Lacroix explains

*** For inside mount installations, do not make any deductions. We will make the deductions for you. ***
1. Make sure your window has sufficient depth to install the selected product. Refer to the "Minimum Depth Required" section of the selected product. If your window does not have the minimum required depth, you will need to select another product or install it exterior frame. ( also known as exterior installation )
2. Always write down the exact dimensions of your windows when ordering. Make no deductions. We'll make the deductions for you and we’ll make sure the product is designed specifically for your window. Please note that all of the fabric products installed interior window frame may have a play of light between the window frame and the fabric that can go up to ¾’’
Width:
For all products, we suggest measuring the width at the top, center, and bottom of the window. apply the smallest dimension when ordering.
Height:
Measure the height also at three different places. Left, center and right and apply the shortest dimension when ordering.

1. Specify the width as well as the exact height you want your product to have. The product will be made to measure according to these dimensions.
2. Consider adding additional height to include the header ( cassette ) dimension in your measurement. To install wall brackets on the molding, add 1 5/8 "to the total height of the window. (For an installation of brackets above the molding, we suggest adding a total of 4 inches to the height in order to have excess fabric at the bottom of the window. (Does not apply for windows that go to the floor ex: Patio door).
3. The dimension for the height includes the cassette. (The height indicates the desired height from the top of the cassette to the bottom of the blind in the closed position) Note that the Zebra blind will raise slightly when in day position.
4. When selecting exterior installation ( width cassette ), the dimension given for the width will correspond to that of the cassette. The fabric will be 1 1/8" narrower than the dimension given. If you select exterior installation (Fabric width),the dimension given for the width will correspond to that of the fabric. The cassette will then be 1 1/8" wider than the given width.
5. Be on the lookout for any moldings, door handles or locks that may be in the path of your blind. If this is the case, and you are unsure of the possibility of the installation, please do not hesitate to send us an image photo via email at info@justedesstores.ca and it will be our pleasure to assist you with any situation.

Zebra blinds and roller shades consist of a half-moon cassette which is easy to install.
Use a steel tape measure. Measure to the nearest 1/8 (eighth of an inch). Do not round off your measurements to the nearest inch. On your note sheet, clearly indicate which measurements are widths and which are heights. It is very easy to reverse measures which is why it is important to be vigilant. Always indicate WIDTH first, then followed by HEIGHT. (W x H) Remember that it is essential when choosing interior installation to keep the dimensions of the window AS IS. We will make the necessary deductions on the product.
The dimension for the height includes the cassette (The height indicates the desired height from the top of the cassette to the bottom of the product in the closed position.) Note that the Zebra Blinds will raise slightly when in day position.
Is interior installation the right choice for your window?
Before taking your measurements, make sure that interior installation is possible for your window and that no moldings, door handles or locks will be in the path of your blind
We normally recommend an interior installation as it provides a clean look. However, an exterior installation can make the window appear larger or hide an unattractive window. For a interior installation, the depth of the frame must have the required minimum of 1 1/2 to allow the installation of the brackets. When taking measurements of exterior installation, do not forget to add of 2 1/2 '' to the total height dimension of the frames if you wish to install the brackets on the wall.
We will custom make your blinds according to the dimensions written on your order. If unfortunately measurements are not correct, there will unfortunately be cutting costs, as long as the blind has been ordered too large. Take your time when taking your measurements and do not hesitate to contact us if you have any questions.
Tip: When taking your measurements, you will find that sometimes your windows are not perfectly square, very few are. If it's minimal, this will not cause a problem. Otherwise, you may need to consider exterior installation.
Width:
Take the measurements of the width at the top, center and bottom of the window. Always measure to the nearest 1/8 ''. Keep the smallest dimension. Use steel tape at all times.
Height:
Measure the height also at three different places. Left, center and right and apply the smallest dimension when ordering.
When you specify "interior installation" your blind will be made slightly smaller so you will get a perfect fit in your window frame. Do not make any deductions when taking your measurements.
Make sure you have a minimum depth of 1 1/2 '' so that you can attach the brackets.

Use a steel measuring tape, Measure to the nearest one eighth of an inch 1/8” . Do not round off your measurements to the nearest inch. On your note sheet, clearly indicate which measurements are widths and which are heights. It is very easy to reverse measures which is why it is important to be vigilant. Always indicate WIDTH first, then followed by HEIGHT. (W x H)
TRICK
When selecting the type of installation Exterior (Cassette width), the dimension given for the width will correspond to that of the cassette. The fabric will be 1 1/8 narrower than the dimension given. If you select the installation Exterior (Fabric width), the dimension given for the width will correspond to that of the fabric. The cassette will then be 1 1/8 "wider than the given width. The dimension for the height includes the cassette. The height indicates the desired height from the top of the cassette to the bottom of the product in the closed position. Note that the zebra blind bottom aluminum rail rises slightly when it is in the "day" position.
For an outside mount installation:
Specify the width as well as the exact height you wish to have your blind. The product will be made to measure according to your dimensions.
The dimension for the height includes the cassette in the height. (The height indicates the desired height from the top of the cassette to the bottom of the product in the closed position.) Note that the zebra blinds will raise slightly when in day position. For mounting brackets on the molding , the height of the brackets is 1 5/8 ". (For an installation of brackets above the molding, we suggest adding a total of 4 inches to the height in order to have excess fabric at the bottom of the window. (Does not apply for windows to the floor ex: Patio door)).
Add additional width and height to your measurements for more privacy and added darkness. An additional 3 ’’ on each side is suggested.
When selecting exterior installation (Cassette width), the dimension given for the width will correspond to that of the cassette. The fabric will be 1 1/8 "narrower than the dimension given. If you select the exterior installation (Fabric width), the dimension given for the width will correspond to that of the fabric. The cassette will then be 1 1/8 "wider than the given width.
Be on the lookout for any moldings, door handles or locks that may be in the path of your blind. If this is the case, and you are unsure of the possibility of the installation, please do not hesitate to send us a photo image via email at info@justedesstores.ca and it will be our pleasure to assist you with this situation.


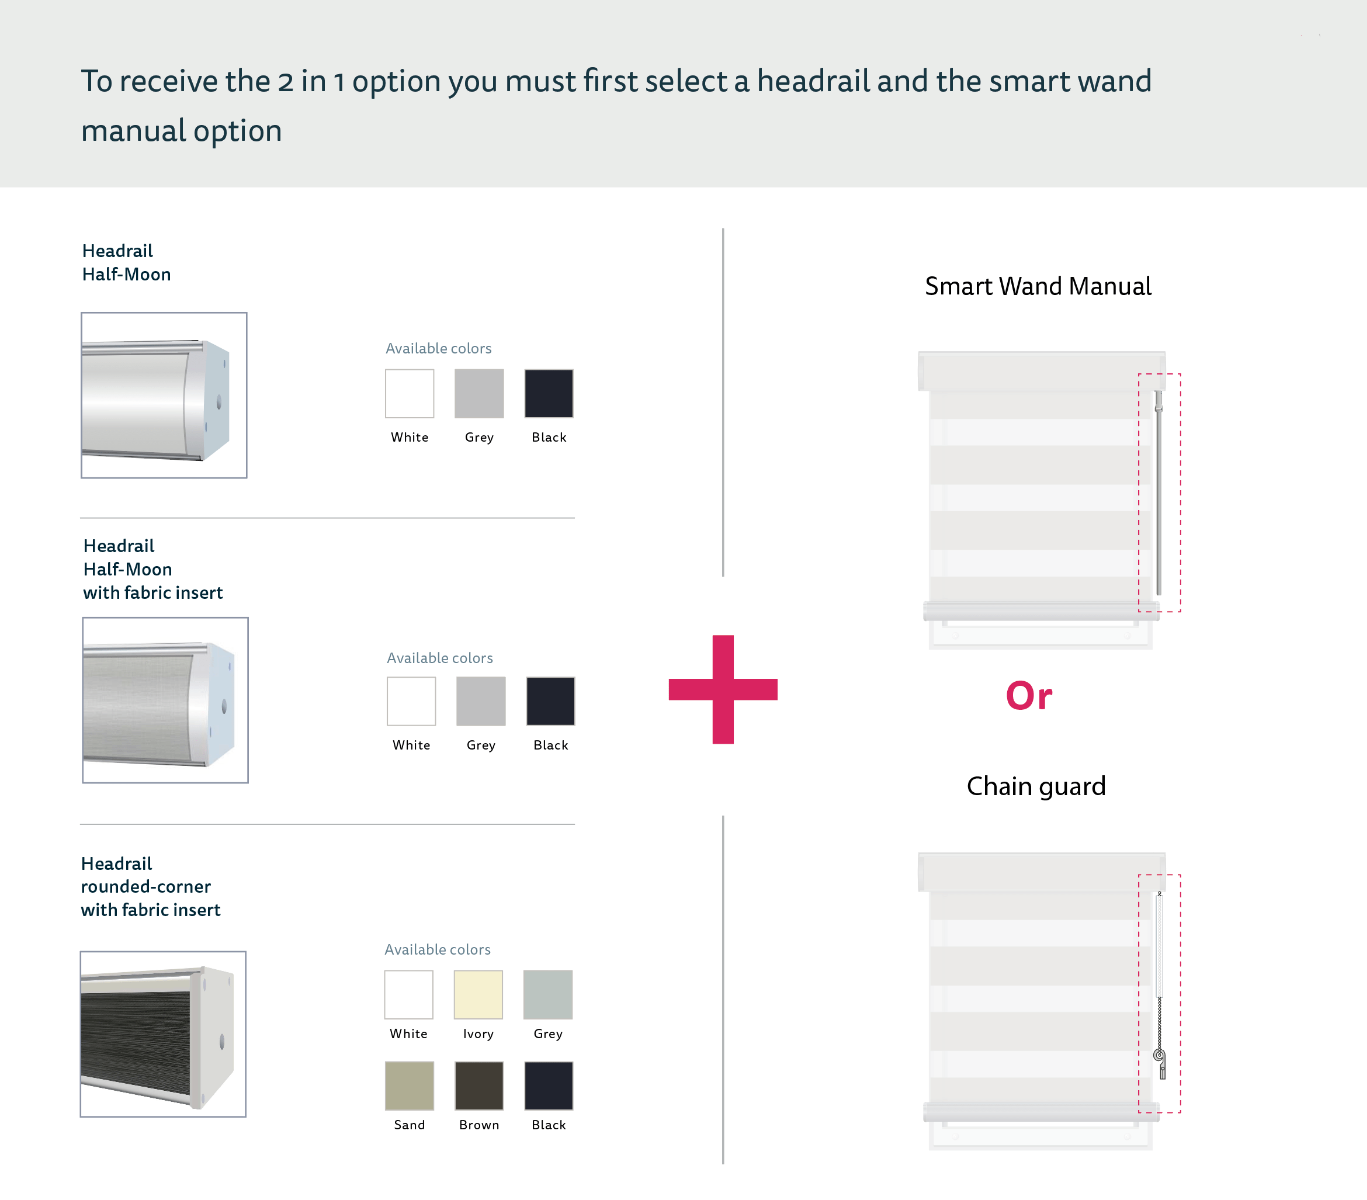
The 2 in 1 option (two blinds on one header)
An ideal solution to dress your patio door
The 2 on 1 option is currently available in all colors by selecting the 'Rounded corners fabric covered' cassette also available in white, gray and black color if selecting the Half-Moon and Half-Moon fabric covered cassettes . (To activate the "2 in 1" option, select one of the above options when choosing the cassette. The 2 in 1 option will activate on the next question in the purchasing process).
Once you have selected the 2 in 1 option, you will then have the option of selecting the division of fabric into two equal sections or a division that is not in the center. You can then enter your dimensions if the division is not in the center.
There may be a distance of approximately ¾ inch between the two fabrics in the center.
When measuring a blind with a 2 in 1 option, refer to the measurement of the standard window.


Important
This option must be selected during cassette choice when ordering
For the measurement, please refer to standard window

First you will need a cardboard template to help you take your measurements well. The purpose of these templates is to imitate the exact space that the cassette will need in your window frame and thus avoid overlapping blinds. We will use the term "Product Limit" to refer to the measurement for the width of the cassettes.

First, determine the size of the templates to be made by referring to the table below. You will need to know the type of installation required as well as the desired cassette for this step. You will need two boxes for the measurement which we will call "A" and "B".
To help you take your measurements, you will need to make cardboard templates with the cassette width and depth selected.

| Headrail | Template |
|---|---|
| Half Moon | 3 3/4’’ x 12’’ |
| Half Moon with fabric | 3 3/4’’ x 12’’ |
| Rounded Corner | 3 5/8’’ x 12’’ |
| Rounded Corner with fabric | 3 5/8’’ x 12’’ |
| Cellular blind | 2’’ x 12’’ |
| Headrail | Template |
|---|---|
| Half Moon | 4 3/8’’ x 12’’ |
| Half Moon with fabric | 4 3/8’’ x 12’’ |
| Rounded Corner | 4 1/4’’ x 12’’ |
| Rounded Corner with fabric | 4 1/4’’ x 12’’ |
| Cellular blind | 2 1/8’’ x 12’’ |
For this type of product, always select the "Exterior (Cassette width)" installation when ordering (Even if the product is installed inside the frame). We don't want any additional deductions on the blinds in this case.
Before you start noting your measurement, we need to determine the product limits. To do this, place the cardboard templates as in the diagram below. Start by placing your template "A" in the corner of the left side of window # 2 and then place template "B" in window # 1 until the tips of the two templates meet. Mark where the templates end. You have just determined the first two limits of the blinds measurement of your bay window.
Then do the same exercise by placing strap '' A '' in the corner of the right side of window # 2 and then place template `` B ''over window # 3 until the tips of both templates meet. Mark where the templates end.
For window # 1 and # 3, we now need to determine the end points of the products on the side opposite to window # 2.
For an inside mount installation, the stopping point will be at the opposite end of the template ‘’ A” inside the window frame.
If the installation is done exterior frame, you can add width to the product so that the fabric hides the molding completely. To determine this dimension, we need to know whether the control cord will be on the end point side. You can refer to the following guide: ** Important when ordering exterior installation (Cassette width) ** Not applicable for indoor installations
Be on the lookout for any moldings, door handles, locks that could be in the path of your blind. If this is the case, please notify us.
| Where blind ends | Dimension to add |
|---|---|
| I would like the cassette to end at this spot | o’’ |
| I would like the fabric to end at this spot | + 3/4’’ |
| I would like the fabric to hide the molding | + 1 1/2’’ |
| Where blind ends | Dimension to add |
|---|---|
| I would like the cassette to end at this spot | o’’ |
| I would like the fabric to end at this spot | + 3/8’’ |
| I would like the fabric to hide the molding | + 1 1/8’’ |
Use a steel measuring tape. Measure to the nearest 1/8 (eighth of an inch). Do not round off your measurements to the nearest inch. On your note sheet clearly indicate which measurements are widths and which are heights. It is very easy to reverse measures which is why it is important to be vigilant. Always indicate WIDTH first, then followed by HEIGHT. (W x H)
WIDTH
Now that all your measurement marks are in place, we only need to measure from mark to mark for each blind of all windows. Measure to the nearest eighth of an inch. Remember to use exterior installation (Cassette width) option when ordering.
HEIGHT
If the installation is inside the frame, follow the following guide: Measure the height also at three different places. Left, center and right and keep the smallest dimension.
The dimension for the height includes the cassette in the height. (The height indicates the desired height from the top of the cassette to the bottom of the product in closed position.) Note that the zebra blind will raise slightly when it is in “day” position. For mounting brackets above the molding, the height of the brackets is 1 5/8

When you come across a corner window, there may be a privacy issue. This is caused by the distance in between the blinds. To minimize this problem, consider installing a product that will be accommodate this issue.

Each corner window is often unique, we suggest you email us with a photo of your window so that we can better assist you at info@justedesstores.ca


For the width, consider adding extra width so that the window molding is completely covered. Be sure to leave enough space for the door handle. The blind must not come into contact with it.
The best for option French doors is to use the "Exterior (Fabric width)" type of installation. If you select exterior installation (Fabric width), the dimension given for the width will correspond of that of the fabric. The cassette will then be 1 1/8 wider than the given width. So you can determine exactly how wide you would like the fabric to be. We normally suggest adding ½ ”of additional fabric to each side of the window moldings.
For the height, Since the installation of the wall mount brackets are done above the window molding, make sure to add the space necessary for installation of brackets. The height of the wall mount brackets is 1 5/8 (When installing the brackets above the molding, we suggest adding 4 inches total to the height in order to have extra fabric at the bottom of the window. Note that the zebra blinds will raise slightly when it will be in the “day” position.
All products can be installed on wood and metal. For metal doors, you will likely need "self-drilling" type screws designed specifically for metal.
WIDTH
Take the width including the window moldings. Add 1 "to this width. Be sure to select the exterior installation (Fabric width) when ordering.
HEIGHT
Take the total height including the window moldings. If the height allows, add 4 inches to this height. (During installation, you will install the wall mount brackets just above the top molding).


All our custom-made blinds and shades are delivered free of charge throughout the province of Ontario, Quebec, New Brunswick, Nova Scotia and Prince Edward Island. Only land delivery shipments are included in this offer.
Customer satisfaction is extremely important to us, that’s why we offer our satisfaction guarantee on all our custom-made blinds and shades purchased on TrueBlinds.ca
When the time comes to invest in window coverings, it is important to make the right choices and to ensure that you are purchasing a durable product. TrueBlinds.ca promises to offer you a Premium quality product. Our blinds are identical to one used by renowned designers and the popular brands. Over 35,000 satisfied customers have already chosen TrueBlinds.ca for their custom blinds and shades.
Order our free samples today so you can be assured of your choices. Did you know that fabric color reacts differently depending on the type of lighting in your home? Avoid unwanted surprises by choosing your blinds with a company that will only allow you to see their blinds in their light! We will send you our fabric to your home so you can confirm under your lighting and decor that you’re making the right choice.
Order your free samples today!
A new Corded Window Covering Regulations (CWCR) under the Canada Consumer Product Safety Act (CCPSA) has come into force.
The CWCR requirements play an important role in helping to eliminate the strangulation hazard associated with string window coverings and help protect the health and safety of children.
The law requires that the length of a reachable cord cannot exceed 22 cm (8 ½’’) on all window coverings whether they are made in Canada or imported.
TrueBlinds is proud to offer you safe solutions for your window coverings.
Free on all our products. (Maximum height of 78'' for alternating blinds)
motorization system available starting at only $99.
For all the details, visit: https://laws-lois.justice.gc.ca/eng/regulations/SOR-2019-97/page-1.html